Video Edit List
What is it?
The Custom Edit List allows you to put together a video time line, which will allow for more fine grained control over effects, such as jump cuts and pans and zooms, by specifying which section of the video you wish to edit. Think of it like a time line editor.
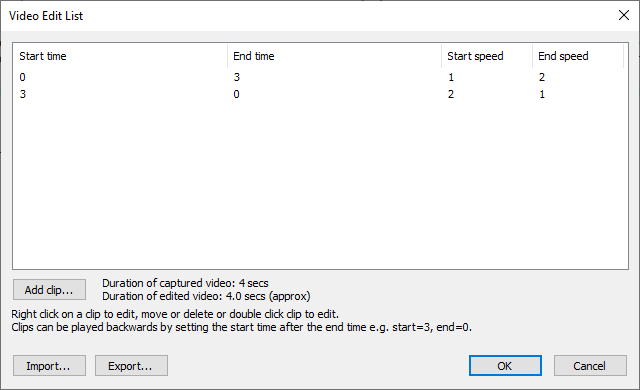
Each entry in the video edit list has a start time, end time, start speed and end speed. Each entry can also have an optional start transformation and end transformation.

In this Guide
- Start & End Times
- Start & End Speeds
- Jump Cuts
- Sharing Settings
- Editing Clips
- Adding Clips
- Start & End Transformations
- Panning
- Zooming
- Rotating
- Combining Transformations
- Testing with Sample Videos
Start & End Times
The start and end times specify the start and end times of the clip taken from the original video, If the start time is less than the end time the video will be played forward. If the start time is after the end time the video will be played backward (from the end time to the start time). In the screenshot above the first edit plays the video forwards from the start to 3 seconds into the video and then plays the video backwards from 3 seconds back to the start.
Start & End Speeds
The start and end speeds specify the speed of playback of the clip. If the start and end speeds are set to the same value the clip will be played at a constant speed. If the start and speeds are set to different values the playback speed will change smoothly from the start speed to the end speed. In the screenshot above the first clip will start at normal speed and will gradually speed up to 2x normal speed by the end of the clip. The second clip will start a 2x speed and gradually ramp down to normal speed at the end of the clip.
Jump Cuts
Jump cuts can be added by adding clips with different start and end times e.g. to play the first two seconds of the video twice: once at normal speed and then again at double speed you could add two clips:
| Clip No. | Settings |
|---|---|
| 1 | start time=0, end time= 2, start speed=1, end speed=1 |
| 2 | start time=0, end time= 2, start speed=2, end speed=2 |
Sharing Settings
The "Export..." and "Import..." buttons can be used to save the custom edit list to a file for future reference or to load a previously saved custom edit list. When you import a custom edit list from file it will overwrite any clips that have already been defined.
Editing Clips
Right click on a clip in the edit list to edit, delete or change its position in the list or to insert a clip before or after it. You can also double click on a clip to edit it.
Adding Clips
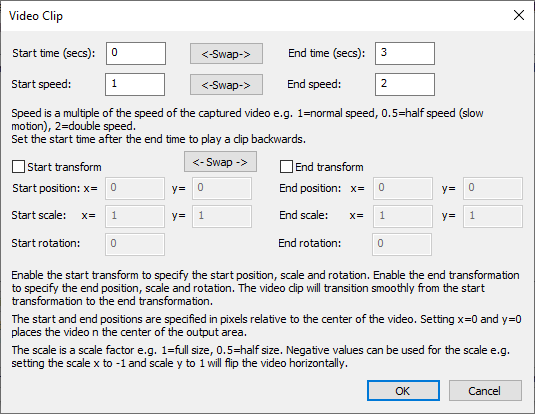
New clips can be added to the edit list by clicking on the "Add clip..." button:

Start & End Transformation
The optional start transform specifies the size, position and rotation of the video clip at its start. If an end transformation is defined with different size, position and rotation settings from the start transform the video will smoothly transition from the start transform to the end transform as it is played e.g. to zoom in 2x as the clip plays set the start transform scale to x=1 and y=1 and the end transform scale to x=2 and y=2.
If the end transformation is disabled the clip will play using the size, position and rotation specified by the start transform. If the start transform is disabled and the end transformation is enabled the clip will start from its current size, position and rotation and smoothly transition to the size, position and scale defined by the end transform.
Panning
Panning the video: set the x and y values of the start position where the video should appear at the start of the clip and the x and y values of the end position where the video should appear at the end of the clip. As the clip plays the video will move smoothly from the start position to the end position. The x and y values specify the position of the center of the captured video relative to the origin which is in the center of the output video. x values control the horizontal position and y values control the vertical position.

Zooming
Zooming the video: set the x and y values of the start scale to the scale of the video at the start of the clip and the x and y values to the scale at the end of the clip. As the clip plays the video will scale smoothly from the start scale to the scale position. The video is scaled relative to its center. The video can be flipped by setting the x or y scale values to a negative number e.g. to mirror a video set the x scale to -1 and the y scale to 1.

Please note: it is best to avoid setting the x or y scale settings to 0 as this can cause glitches in the final video. Also avoid setting the start and end scales so that the transition passes through 0 e.g. to flip a video on the screen it is better to break it down into two clips: one to transition the scale from x=1, y=1 to x=0.01, y=1 and then one to transition the scale from x=-0.01, y=1 to x=-1, y=11. You may get unsightly glitches if you try to do this in one step by setting the start scale to x=1, y=1 and the end scale to x=-1, y=1.
Rotating
Rotating the video: set the start rotation to the angle that the video should start at and the end rotation to the angle at the end of the clip. The video will smoothly rotate about its center point from the start rotation to the end rotation. Angles are specified in degrees and specify a clockwise rotation.

Combining Transformations
Different transforms can be combined e.g. to shrink the video to a tiny dot in the bottom left corner of the output video set the start transformation to position x=0, y=0, scale x=1, y=1, rotation=0. Then use the size of the output video to work out the end position e.g. if the output video is 600x900 pixels in size set the end transformation to position x=-450, y=300, scale x=0.01, y=0.01, rotation=0. (Remember the the origin is in the center of the output video and left is negative and down is positive)).

Testing with Sample Videos
You can test the video processing using a previously recorded video by naming the video sample_video.mov or sample_video.mp4 and placing it in the same folder as the screen images and syncing it to the iPad. When the event is run it will capture video normally and then process the sample video instead.
Important: Don't forget to remove the sample video after testing.
