Video Settings
Videos can be captured with with sound (e.g. for a video guestbook) or without sound with effects such as boomerang (forward then backward playback) or custom edits such as jump cuts or speed ramping. These are ideal for 360 photo booths or as an alternative to burst GIFs to give smoother playback or more creative editing with special effects.
Transformations such as panning, zooming and rotating can be applied to videos.
You can also apply effects such as AI background removal (aka green screen without the green screen) to videos and play them with a background video and an overlay video.
A static PNG overlay can be added to the video or an alpha video in HEVC format can be added to give an animated overlay. A background video can also be played behind the captured video clip.

In this Guide
- Device Requirements
- Intros, Outros and Overlays
- Filenames
- Enable Video
- Spinner Auto Start
- Live View
- Countdown
- Frame Rate
- Duration
- Output Size
- Cropping
- Aspect Ratio
- Custom Edit List
- Loops
- Playback Speed
- Boomerang
- Audio
- Audio Guest Book Mode
- Confirmation Screen
- Filename Suffixes
- Effects
Device Requirements
To use video post processing you need a device with an A11 processor or better e.g. a 2019 iPad or better. A fast device such as a 2022 or 2021 iPad Pro, 2022 iPad Air, 2022 iPad 10.9" or 2022 iPhone SE is recommended when applying AI background removal to videos.
Intros, Outros, Overlays and Soundtracks

Filenames
| Filename | Description |
|---|---|
video_intro.mov video_intro.mp4 |
An optional video played before the captured video |
video_outro.mov video_outro.mp4 |
An optional video played after the captured video |
video_soundtrack.mp3 |
An optional soundtrack |
| video_overlay.png | An optional graphic placed over the captured video. The alpha channel of the PNG can be used to control the transparency of the different areas of the overlay from fully transparent to fully opaque. |
| video_overlay.mov | An optional alpha video placed over the captured video. The alpha channel of the PNG can be used to control the transparency of the different areas of the overlay from fully transparent to fully opaque. Note: Files must be .hevc or ProRes4444 |
video_background.mov video_background.mp4 |
An optional view played behind the captured video |
Enable Video
Select "Create video" to enable video capture and use the output folder setting to specify where it should be saved.
Spinner Auto Start
When "Spinner auto start mode" is selected the iPad or iPhone detects when a 360 degree spinner starts spinning and automatically starts the countdown and captures the video. This works when the iPad or iPhone is in portrait or landscape orientation.
Please note: Spinner auto start mode is only active when the video ready screen is displayed.
Live View
Normally live view images are displayed in the video ready screen and during video capture but this can be disabled by selecting "Hide live view in ready screen" and "Hide live view during countdown and video capture".
Countdown
The "Countdown text" specifies how the countdown text should be formatted during the countdown before taking each photo. Use the "Countdown (secs)" setting to specify duration of the countdown. The countdown can use the following token:
| Token | Description |
{videoCountdown} |
the number of seconds remaining in the countdown before capturing the video |
Please note: This setting is ignored if an animated GIF or video animation is used for the countdown. In this case the length of the countdown will be determined by the length of the GIF or video.
Frame Rate
The "Frame rate (fps)" setting selects the frame rate of the captured video. The standard frame rate for normal playback is 30 fps. Higher frame rates are available for slow motion capture. The maximum available frame rate depends upon the device and whether the front or back camera is being used.
If a higher frame rate is specified than is supported by the camera the highest frame rate supported by the camera will be used e.g. if a frame rate of 240 fps is specified when using the front camera the video will be captured at 60 fps.
Duration
The "Duration (secs)" setting specifies the duration of the captured video.
Please note: If you are running a video guestbook you may want to set the duration to 30 secs or 60 secs and then add a button for guests to press when they've finished recording their message. You can do this by adding a video_capture.png screen image with the button graphics and then add a "videoEnd" touchscreen action using the Touchscreen Editor.
Output Size
The "Output video size" dropdown list controls the size of the final output video. It has two options:
Scale video to fit bounding box
The source video is resized, maintaining its aspect ratio, to fit the bounding box defined by the the max width and max height sizes and this is the size used for the output video. Use this option if you want the source video to fill the output video.
Examples:
source video 1280x720 pixels in size, aspect ratio set to video16to9, max width=1280 and max height=720 the output video will be 1280x720 pixels in size
source video 1280x720 pixels in size, aspect ratio set to video16to9, max width=640 and max height=640 the output video will be 640x360 pixels in size
source video 1280x720 pixels in size, aspect ratio set to square, max width=600 and max height=600 the output video will be 600x600 pixels in size
Actual size
The actual width and height sizes define the actual size of the output video in pixels. The source video is added to the output video area without resizing. Use this option if you want the output video to have a different aspect raito to the source video.
Examples:
source video 1280x720 pixels in size, aspect ratio set to video16to9, max width=1280 and max height=720 the output video will be 1280x720 pixels in size
source video 1280x720 pixels in size, aspect ratio set to video16to9, max width=640 and max height=640 the output video will be 640x640 pixels in size and the source video will be 1280x720 pixels in size and will be too large to fit unless it is scaled using the custom edit list transformations.
source video 1280x720 pixels in size, aspect ratio set to square, max width=640 and max height=640 the output video will be 640x640 pixels in size and the source video will be 720x720 pixels in size and will be too large to fit unless it is scaled using the custom edit list transformations./d
Cropping
The video can be cropped using the "Photo aspect ratio" setting in the General Settings.Set the "Photo aspect ratio" to video16to9 and use the "Scale to fit bounding box" setting o output the video without cropping.
Aspect Ratio
The size of the source video is affected by the "Photo aspect ratio" setting in the General Settings, the device orientation and whether the live view area defined in the ready screen in the Touchscreen Editor is landscape or portrait:
Custom Edit List
Select "Custom edit list" to apply custom edits such as jump cuts, speed ramping, panning, zooming and rotating to the processed video. Click on the "Edit..." button to edit the custom edit list.
Please note: The custom edit list overrides the loop, boomerang and playback speed settings and these options will be disabled when custom edit list is enabled. The custom edit list can apply the same effects as the boomerang, loops and playback settings and can also apply more creative effects such as jump cuts, speed ramping, panning, zooming and rotating.
Please the guide on the Custom Edit List for more details
Loops
Set the number of loops to the number of times the video is repeated between the optional intro and outro videos. This setting is useful because many devices play a video from start to end and then stop instead of playing it in a continuous loop.
Playback Speed
The playback speed specifies how fast the processed video is played back. If this is set to 1 the video will be played back at normal speed. If the speed is set to a value higher than 1, e.g. 2.5, the video be played back faster and if it is set to a value lower than 1 it will be played back slower to give a slow motion effect.
Boomerang
Select the "Boomerang (forward/backward)" setting to create a boomerang video. This will display the video forwards first and then play it backwards.
Audio
Select "Capture audio with video" to capture audio using the iPad or iPhone's microphone or an external microphone e.g. for a video guest book.
Please note: audio capture is disabled when using a custom edit list, creating a boomerang video, changing the playback speed or specifying more than one loop. A explanation as to why audio is disabled is displayed under the capture audio checkbox.
Audio Guest Book Mode
Select the audio guestbook mode option to create an audio recording with a simple video (as opposed to recording a video of the guest). To use this mode create a simple video file named video_audio_guestbook.mp4 or video_audio_guestbook.mov and place it in the screen folder. When video clip is captured the audio from the captured clip is combined with the video from the video_audio_guestbook.mp4 file to create the output video. The video captured from the iPad's camera is discarded.
Confirmation Screen
Select "Display confirmation screen" to display the processed video in the confirm printing screen after capture. The confirmation screen gives the user the chance to review the video and to accept or reject it.
Set the timeout to the number of seconds the confirmation screen should be displayed before it is closed automatically. Set "Accept video on timeout" to automatically accept the video if the timeout occurs otherwise it will be cancelled and the photo booth will return to the ready screen.
Filename Suffixes
The "Overlay/background filename suffix" provides a way of dynamically selecting different overlays and backgrounds for the videos. Normally the filename for the background video is video_background.mp4 or video_background.mov and the overlay video is video_overlay.mov but this can be modified to dynamically select different overlay and background images using information such as the time, user responses to surveys or random numbers.
The overlay/background suffix can also be used to select the countdown and capture screens. One use for this is when using a survey to select different backgrounds when using AI background removal.
Status Message
The status message displayed at the bottom of the video settings dialog shows if there any additional files in the current screen folder that will affect the output video e.g. video intro and outro, soundtrack or overlays.
Effects
Use the "Effects" drop down list to select an effect to apply to the video.
| Effect | Description |
| Thirds | displays three vertical strips side by side showing he center of portion of the video. The left and right strips slide in from the sides at the start and slide out up and down at the end |
| thirds+fade out | similar to "thirds" but the left and right strips fade out at the end |
| 2x2 | displays 4 smaller copies of the video in a 2x2 arrangement. Each copy slides in from the corners at the start and slide out again at the end |
| 2x2+fade out | similar to "2x2" but the 4 copies of the video fade out at the end |
| 3x3 | displays 9 smaller copies of the video in a 3x3 arrangement. Each copy slides in from the corners and sides at the start and slide out again at the end |
| 3x3+fade out | similar to "3x3" but the 9 copies of the video fade out at the end |
By default each effect consists of a 1 second start transition, 4 secs playback and a 1 second end transition and is applied 2/3 of the way into the final video (or sooner if the video is shorter). Click on the "Settings..." button to adjust the video effect settings:
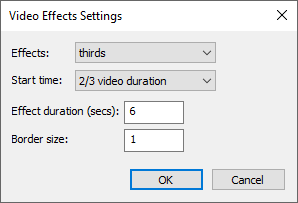
The effect can be selected using the "Effects" dropdown list.
The "Start time" dropdown list controls when the effect is applied. This can be set to:
start of video
- 1/3 video duration" e.g. 6 secs after the start of a 18 sec video
- 1/2 video duration" e.g. 9 secs after the start of a 18 sec video
- 2/3 video duration" e.g. 12 secs after the start of a 18 sec video
- end of video" e.g. e.g. if the effect lasts 5 secs it starts 5 secs before the end of the video
- time from start (secs)": allows the start time to be specified in seconds after the start of the video
Effect Duration
The "Effect duration (secs)" setting specifies the duration of the effect including 1 sec for the start transition and 1 sec for the end transition. If this is set to more than 2 secs the effect is held for that number of seconds e.g. if the duration is set to 6 secs for the thirds effect this will display the 1 sec start transition followed by 4 secs with the 3 vertical strips and then the 1 sec end transition.
Border Size
The "Border size" setting specifies the size of the border between the video elements. The background is visible in border areas and is black unless there is a background video playing (video_background.mp4 or video_background.mov).